Android and GitHub - Starting a new project
There are many ways to add a new Android project to GitHub. However figuring out the steps each time you start a new project takes a bit of trial-and-error, so I've decided to document the steps which I've found to be the most straightforward to complete this task.
1 Create a new project in Android Studio
It's not important whether we create our project first in Android Studio or in GitHub, but that we have them both created.
- Start by creating a new Android project in Android Studio.
- Be sure to note the Project location where the project is being saved to when configuring a new project, which is presented in the first dialogue window.
2 Initialize the new directory
After Android Studio finishes creating the project, open a cmd tool like Git Bash to initialize the project as a Git repo.
- Navigate to the project location created by Android Studio.
- Type $ git init to initialize the directory.
- Type $ git add . to add the files to git. The "." that comes after add tells git that we want all files in the current directory to be added to our Git repo.
- Type $ git commit -m "<Our commit message>". The first commit message will typically be "Initial commit".
3 Create a new GitHub repo
Now let's create our project on GitHub.
- Log onto GitHub.
- Create a new repo by clicking on the + button on the upper right corner and select New repository.
- Provide the Repository Name and a Description.
- Do NOT check the boxes under Initialize this repository with a README .
- Do NOT create a .gitignore or README file. Those can be added later.
- Click Create repository.
4 Push the local repo to GitHub
Once we have both our local project and GitHub setup, we're ready to connect the two.
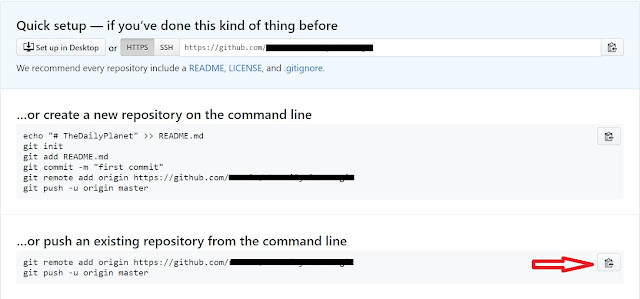
- After creating the new repo, we'll be taken to a Quick Setup page.
- Follow the instructions under …or push an existing repository from the command line. Click on the image of the clipboard to copy/paste the commands into your command prompt.
$ git remote add origin git@github.com:username/userrepo.git
$ git push -u origin remote
- The first git command creates the remote branch called "origin" with the given git address.
- The second git command pushes the content to the remote branch named "origin" from our current local directory.
- Using the SSH link option requires us to enter our paraphrase password each time we push to GitHub.
- Using the HTTPS link option does not requires us to enter our paraphrase password.
 |
| 4 GitHub Quick Setup page |
5 Edit the .gitignore file in GitHub
Now that our files have been pushed from the local directory onto GitHub, edit the .gitignore file. The .gitignore file simply tells git to ignore certain system files that will constantly change while working with Android Studio, but are unimportant in regards to actual code changes to our project.
- Under our GitHub repo, click on the .gitignore file.
- Click on the pencil icon on the right hand side, which will allow us to Edit this file
- Click on drop down box next to Want to use a .gitignore template? and select Android
- Under Commit changes add a comment such as "Update .gitignore"
- Leave the box ticked that says Commit directly to the master branch
- Click Commit changes
 |
| 5 Choose Android for your .gitignore file |
6 Pull updated .gitignore file from GitHub
Since GitHub now contains a .gitignore file that is different from our local repo, we need to pull that file into our local repo.
- In our cmd tool, type $ git pull origin
Now our local repo is in sync with its remote repo on GitHub. If this helps anyone or if someone else has another method that they use to upload their projects to GitHub, please comment or share.

Comments
Post a Comment